本記事は以下の続きです。Istioを使って流量制御を行います。
MicroK8sでistioによるABテストを試してみる(1/2)
- アプリケーションのServiceを作成する
- Istioの設定をする
- Istio Ingressgatewayの設定を変更する
- Gatewayを作成する
- Virtual Serviceを作成する
- 設定を確認する
アプリケーションのServiceを作成する
MicroK8sでistioによるABテストを試してみる(1/2)で作成したアプリケーションに、helloa, hellobで名前解決できるServiceを付与します。
ubuntu@microk8s-vm:~$ microk8s.kubectl expose pod helloa --name=helloa --port=8080 -n istio-app
service/helloa exposed
ubuntu@microk8s-vm:~$ microk8s.kubectl expose pod hellob --name=hellob --port=8080 -n istio-app
service/hellob exposed
ubuntu@microk8s-vm:~$ microk8s.kubectl get svc -n istio-app
NAME     TYPE        CLUSTER-IP       EXTERNAL-IP   PORT(S)          AGE
helloa   ClusterIP   10.152.183.63    <none>        8080/TCP         7m23s
hellob   ClusterIP   10.152.183.36    <none>        8080/TCP         7m11s
Istioの設定をする
Istio Ingressgatewayの設定を変更する
Istio Ingressgatewayの設定を変更します。
Istio IngressgatewayはIstioで構成されたアプリケーションの入り口となるServiceです。istio-system namespaceで稼働していて、Service TypeがLoadBalancerです。IngressIPを設定できる場合はLoadBalancerIPとして設定すれば問題ありませんが、MicroK8sはデフォルトでは使えないのでNodePortに変更しておきます。
この設定は、Istioのドキュメントにも記載があります。
以下のコマンドでspec.typeをLoadBalancerからNodePortに変更します。
ubuntu@microk8s-vm:~$ microk8s.kubectl edit svc istio-ingressgateway -n istio-system
Gatewayを作成する
IstioでGatewayを作成します。
Gatewayは、サービスメッシュのエッジで動作するロードバランサーで、http/tcp接続を受信します。Istioで構成されたアプリケーションを外部に公開するには、Ingressgatewayに加えてGatewayが必要になります。
https://istio.io/docs/reference/config/networking/gateway/
ホスト名”hello.example.comyaml”に対して、httpプロトコルを受け付けるhello-gatewayのyamlを以下に示します。このyamlをoc create -f [ファイル名]で作成します。
apiVersion: networking.istio.io/v1alpha3
kind: Gateway
metadata:
  name: hello-gateway
spec:
  selector:
    istio: ingressgateway # use Istio default gateway implementation
  servers:
  - port:
      number: 80
      name: http
      protocol: HTTP
    hosts:
    - "hello.example.com"
Virtual Serviceを作成する
IstioでVirtual Serviceを作成します。
Virtual Serviceはトラフィックルーティングを制御して、Istioで構成されたアプリケーションの振る舞いを変えられます。
https://istio.io/docs/reference/config/networking/virtual-service/
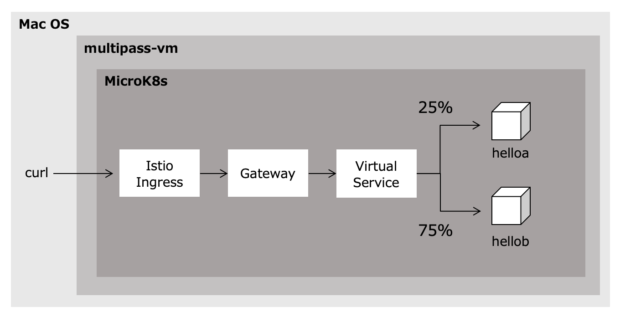
hello.example.comへのhttpリクエストに対して、helloa Serviceに25%、hellob Serviceに75%のトラフィックをルーティングするhello-ab-route Virtual Serviceのyamlを以下に示します。こちらもoc create -f [ファイル名]で作成します。
spec.http.route.destination.hostでServiceを指定し、weightでルーティングするトラフィックの割合を定義しています。
apiVersion: networking.istio.io/v1alpha3
kind: VirtualService
metadata:
  name: hello-ab-route
spec:
  hosts:
  - hello.example.com
  gateways:
  - hello-gateway
  http:
  - route:
    - destination:
        host: helloa
        port:
          number: 8080
      weight: 25
    - destination:
        host: hellob
        port:
          number: 8080
      weight: 75
設定を確認する
最後に設定した流動制御を確認します。
設定したホスト名hello.exapmle.comに対して、Istio Ingressgatewayを経由するcurlコマンドを10回実行してみます。補足すると、Gatewayとして指定している192.168.64.2:31380は、[multipass-vmのIPアドレス]:[NodePortで80番を公開しているポート]です。
$ for i in {0..9}; do curl -s -HHost:hello.example.com "http://192.168.64.2:31380"; done
Hello B
Hello A
Hello B
Hello A
Hello B
Hello B
Hello B
Hello A
Hello B
Hello B
これは綺麗に7:3ぐらいの割合で出力されていますが、何度も繰り返すと、10:0の時もありました。但し、Hello AがHello Bの回数を越すということはなかったので、正しくルーティングされていることが伺えました。
以上です!全体を通して考えると、MicroK8s特有の部分はインストールのところだけでしたね。Istioの勉強をしてみたいと思っていたので、いい機会になりました。