以下の記事でMicroK8sをインストールしてみたので、IstioをインストールしてABテストを試します。今回は長くなってしまったので、インストール編とABテスト編に分けてお送りします。
- Istioをインストールする
- Istio Injection用のnamespaceを作成する
- テスト用アプリケーションを実行する
- アプリケーションソースコードを作成する
- コンテナイメージを作成する
- コンテナイメージをdocker registryに登録する
- コンテナアプリケーションを実行する
Istioをインストールする
以下のコマンドでMicroK8sにIstioをインストールします。Istioを有効化するだけで必要なyamlをダウンロードしてリソースを作成します。
ubuntu@microk8s-vm:~$ microk8s.status | grep istio
istio: disabled
ubuntu@microk8s-vm:~$ microk8s enable istio
Enabling Istio
Fetching istioctl version v1.3.4.
  % Total    % Received % Xferd  Average Speed   Time    Time     Time  Current
                                 Dload  Upload   Total   Spent    Left  Speed
100   635  100   635    0     0    444      0  0:00:01  0:00:01 --:--:--   444
100 36.3M  100 36.3M    0     0  2553k      0  0:00:14  0:00:14 --:--:-- 5118k
・
・
省略
・
・
Istio is starting
ubuntu@microk8s-vm:~$ microk8s.status | grep istio
istio: enabled
インストール完了後、istio-systemというnamespaceに色んなpodがデプロイされていました。
ubuntu@microk8s-vm:~$ microk8s.kubectl get ns
NAME              STATUS   AGE
default           Active   43h
istio-system      Active   119s
kube-node-lease   Active   43h
kube-public       Active   43h
kube-system       Active   43h
ubuntu@microk8s-vm:~$ microk8s.kubectl get pods -n istio-system
NAME                                      READY   STATUS      RESTARTS   AGE
grafana-78758665bb-tbdn8                  1/1     Running     0          7m4s
istio-citadel-799bf7ddb9-hlzjw            1/1     Running     0          7m3s
istio-egressgateway-76d7cf9c58-dlwnx      1/1     Running     0          7m4s
istio-galley-54cb4b4bcd-ptcmx             1/1     Running     0          7m5s
istio-grafana-post-install-1.3.4-hcbgl    0/1     Completed   0          7m6s
istio-ingressgateway-785cd6c5cc-lj7md     1/1     Running     0          7m4s
istio-pilot-5fdd79bcb5-rzfmn              2/2     Running     0          7m3s
istio-policy-7dc9dbf6bc-jrvht             2/2     Running     5          7m4s
istio-security-post-install-1.3.4-bhctr   0/1     Completed   0          7m6s
istio-sidecar-injector-66bc6cf76b-rc868   1/1     Running     0          7m2s
istio-telemetry-66786bfd8f-km8jh          2/2     Running     5          7m3s
istio-tracing-6cb4f885d4-275sq            1/1     Running     0          7m2s
kiali-68d8fc4d54-66s7r                    1/1     Running     0          7m4s
prometheus-5c8fb8f746-m8kc8               1/1     Running     0          7m3s
Istio Injection用のnamespaceを作成する
以下のコマンドでIstio Injection用のnamespaceを作成します。
このnamespace上にデプロイされたpodは、Envoyがサイドカーとして一緒にデプロイされるようになります。
ubuntu@microk8s-vm:~$ microk8s.kubectl create ns istio-app
namespace/istio-app created
ubuntu@microk8s-vm:~$ microk8s.kubectl label ns istio-app istio-injection=enabled
namespace/istio-app labeled
ubuntu@microk8s-vm:~$ microk8s.kubectl get ns -L istio-injection
NAME              STATUS   AGE   ISTIO-INJECTION
default           Active   43h
istio-app         Active   53s   enabled
istio-system      Active   10m   disabled
kube-node-lease   Active   43h
kube-public       Active   43h
kube-system       Active   43h
ubuntu@microk8s-vm:~$
テスト用アプリケーションを実行する
アプリケーションソースコードを作成する
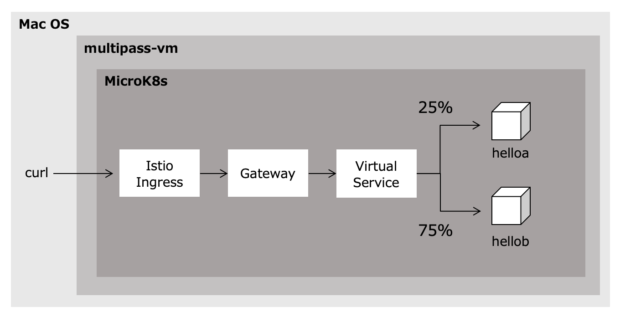
明日はABテストを試してみる予定なので、二つのGoアプリケーションを作成します。httpリクエストをするとそれぞれ”Hello A”, “Hello B”と表示する簡単なサンプルアプリケーションです。
階層構造は以下の通りです。
$ tree hello
hello
├── helloA
│   ├── Dockerfile
│   └── src
│       ├── main.go
│       └── templates
│           └── index.html
└── helloB
    ├── Dockerfile
    └── src
        ├── main.go
        └── templates
            └── index.html
ポート8080を受け付けるとindex.htmlを表示するmain.goを以下に示します。これはhelloA, helloB共に同じです。
package main

import (
    "log"
    "net/http"
)

func main() {
    //templatesフォルダ配下を読み込む
    http.Handle("/", http.FileServer(http.Dir("templates")))
    //サーバー起動
    if err := http.ListenAndServe(":8080", nil); err != nil {
        log.Fatal("ListenAndServe:", nil)
    }
}
helloAのindex.htmlは以下の通りです。
Hello A
helloBのindex.htmlは以下の通りです。
Hello B
helloA, helloB共通のDockerfileは以下の通りです。
FROM golang:latest

# コンテナ作業ディレクトリの変更
WORKDIR /go/src/web
# ホストOSの ./src の中身を作業ディレクトリにコピー
COPY ./src .
RUN go build -o web
# ウェブアプリケーション実行コマンドの実行
CMD ["./web"]
コンテナイメージを作成する
以下のコマンドでそれぞれのコンテナイメージを作成します。
$ docker build -t hellob:latest helloA/
$ docker build -t hellob:latest helloB/
コンテナイメージをdocker registryに登録する
コンテナイメージをMicroK8s上で動かすにはdocker registryに一度登録します。登録方法は以下の記事をご参照ください。
以下のコマンドでdocker registryに登録します。
$ docker tag helloa 192.168.64.2:32147/helloa
$ docker tag hellob 192.168.64.2:32147/hellob
$ docker push 192.168.64.2:32147/helloa
The push refers to repository [192.168.64.2:32147/helloa]
8b8cbdb9bcec: Pushed
0b5b80fff15e: Pushed
6510ca638cc9: Pushed
6e69dbdef94b: Pushed
f0c38edb3fff: Pushed
ef234633eec2: Pushed
8967306e673e: Pushed
9794a3b3ed45: Pushed
5f77a51ade6a: Pushed
e40d297cf5f8: Pushed
latest: digest: sha256:f55138ac329f19a2602f1059a1e62b3b3915b256f42938cb19aadd5e24b9567a size: 2421
$ docker push 192.168.64.2:32147/hellob
The push refers to repository [192.168.64.2:32147/hellob]
475d9ae2ebee: Pushed
c4f195275b83: Pushed
6510ca638cc9: Layer already exists
6e69dbdef94b: Layer already exists
f0c38edb3fff: Layer already exists
ef234633eec2: Layer already exists
8967306e673e: Layer already exists
9794a3b3ed45: Layer already exists
5f77a51ade6a: Layer already exists
e40d297cf5f8: Layer already exists
latest: digest: sha256:e625cd9ac7996901c3b74ff463ee58a7187fbb456f2ea136a482d0ea86c2756a size: 2421
コンテナアプリケーションを実行する
以下のコマンドで、Istio Injection用のnamespaceにサンプルアプリケーションをデプロイします。
ubuntu@microk8s-vm:~$ microk8s.kubectl run helloa --image=localhost:32147/helloa --port=8080 -n istio-app
pod/helloa created
ubuntu@microk8s-vm:~$ microk8s.kubectl run hellob --image=localhost:32147/hellob --port=8080 -n istio-app
pod/hellob created
デプロイした後にpodを確認するとコンテナの数が二つになっています。これはIstioのEnvoyがpodの中で一緒に稼働しているからです。
ubuntu@microk8s-vm:~$ microk8s.kubectl get pods -n istio-app
NAME     READY   STATUS    RESTARTS   AGE
helloa   2/2     Running   0          22s
hellob   2/2     Running   0          10s
今日は以上です!明日は実際にIstioを設定してABデプロイをする方法について書きます。
コメント
コメントは停止中です。