Operator SDKをMacOSにインストールしてgolangでOperatorを作成します。以下の記事の続きでは、Operator SDKのインストールとソースコードの作成を行いました。本記事ではOperatorのビルドとデプロイを実施します。
Operator SDK をインストールしてOperatorを作成する(1/2)
- Operatorのビルド
- Operatorのデプロイ
- CRDの作成
- Opearatorのデプロイ
- CRの作成
- CRの更新
Operatorのビルド
以下のコマンドでOperatorのビルドを実施します。「Operator build complete. 」が出力されれば完了です。
$ go mod vendor
$ operator-sdk build 192.168.64.2:32000/hello-operator:v1
INFO[0008] Building OCI image 192.168.64.2:32000/hello-operator:v1
Sending build context to Docker daemon  118.1MB
Step 1/7 : FROM registry.access.redhat.com/ubi7/ubi-minimal:latest
 ---> 7d397bf59678
Step 2/7 : ENV OPERATOR=/usr/local/bin/hello-operator     USER_UID=1001     USER_NAME=hello-operator
 ---> Using cache
 ---> d4043ef43b60
Step 3/7 : COPY build/_output/bin/hello-operator ${OPERATOR}
 ---> a40f16af6556
Step 4/7 : COPY build/bin /usr/local/bin
 ---> e758ef7bd8d0
Step 5/7 : RUN  /usr/local/bin/user_setup
 ---> Running in fc181e29564c
+ mkdir -p /root
+ chown 1001:0 /root
+ chmod ug+rwx /root
+ chmod g+rw /etc/passwd
+ rm /usr/local/bin/user_setup
Removing intermediate container fc181e29564c
 ---> 8b5e7541c344
Step 6/7 : ENTRYPOINT ["/usr/local/bin/entrypoint"]
 ---> Running in 903d3d9e95d9
Removing intermediate container 903d3d9e95d9
 ---> b4fff90c4f99
Step 7/7 : USER ${USER_UID}
 ---> Running in 8333de254bce
Removing intermediate container 8333de254bce
 ---> 6a813292199d
Successfully built 6a813292199d
Successfully tagged 192.168.64.2:32000/hello-operator:v1
INFO[0022] Operator build complete.
イメージ名は、[multipass-vmのIPアドレス]:[Docker RegistryのNodePort]/[イメージ名]:[タグ]にしています。今回はMicroK8s上のDocker Registryコンテナにpushするので、multipass-vmのIPアドレスとしています。
以下のコマンドでMicroK8s上のDocker Registryにpushしておきます。
$ docker push 192.168.64.2:32000/hello-operator:v1
The push refers to repository [192.168.64.2:32000/hello-operator]
afb9afe8923c: Pushed
f507dc8f12b6: Pushed
570d657b8592: Pushed
da37c371002e: Layer already exists
e0a4651703ad: Layer already exists
v1: digest: sha256:ff4b946376cf992ca5fd83208eb0547eb9dc782f7331633f8712f03b8f86aad4 size: 1363
Operatorのデプロイ
上記でビルドしたOperatorをデプロイします。
CRDの作成
kind: Helloが作成できるように、deploy/crds配下に作成された以下のyamlを使ってCRDを作成します。
apiVersion: apiextensions.k8s.io/v1beta1
kind: CustomResourceDefinition
metadata:
  name: hellos.hello.example.com
spec:
  group: hello.example.com
  names:
    kind: Hello
    listKind: HelloList
    plural: hellos
    singular: hello
  scope: Namespaced
  subresources:
    status: {}
  validation:
    openAPIV3Schema:
      properties:
        apiVersion:
          type: string
        kind:
          type: string
        metadata:
          type: object
        spec:
          type: object
        status:
          type: object
  version: v1alpha1
  versions:
  - name: v1alpha1
    served: true
    storage: true
以下のコマンドで作成します。
$ kubectl create -f deploy/crds/hello_v1alpha1_hello_crd.yaml -n hello-operator
Operatorのデプロイ
Operatorをデプロイします。Operator SDKでプロジェクトを作成すると、deploy配下にデプロイ用のyamlが作成されます。deploy/operator.yamlのイメージ名を変更して、$ kubectl create -f [ファイル名]でデプロイします。
$ kubectl create -f deploy/operator.yaml -n hello-operator
deployment.apps/hello-operator created
$ kubectl create -f deploy/role.yaml -n hello-operator
role.rbac.authorization.k8s.io/hello-operator created
$ kubectl create -f deploy/role_binding.yaml -n hello-operator
rolebinding.rbac.authorization.k8s.io/hello-operator created
$ kubectl create -f deploy/service_account.yaml -n hello-operator
serviceaccount/hello-operator created
OperatorのステータスがRunningになれば大丈夫です。
$ kubectl get pods -n hello-operator -w
NAME                              READY   STATUS    RESTARTS   AGE
hello-operator-64f7df787d-5tq8f   1/1     Running   0          103s
CRの作成
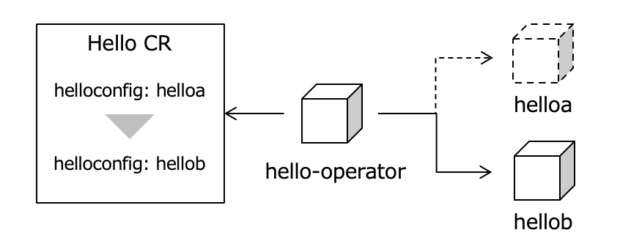
deploy/crds配下に作成されたyamlを以下の通り編集し、CRを作成します。最初はhelloconfigにhelloaを指定してhelloaアプリケーションを作成します。
apiVersion: hello.example.com/v1alpha1
kind: Hello
metadata:
  name: example-hello
spec:
  # Add fields here
  size: 1
  helloconfig: helloa
以下のコマンドで作成すると、自動でhelloaアプリケーションが作成されます。
$ kubectl create -f hello_v1alpha1_hello_cr.yaml -n hello-operator
hello.hello.example.com/example-hello created
$ kubectl get pods -n hello-operator -o wide
NAME                              READY   STATUS    RESTARTS   AGE    IP          NODE          NOMINATED NODE   READINESS GATES
example-hello-pod                 1/1     Running   0          16s    10.1.2.19   microk8s-vm   <none>           <none>
hello-operator-64f7df787d-5tq8f   1/1     Running   0          113s   10.1.2.18   microk8s-vm   <none>           <none>
httpリクエストをすると、Hello Aと表示されます。
$ curl 10.1.2.19:8080
Hello A
CRの更新
helloconfigの値をhelloaからhellobに変更して、hellobアプリケーションをデプロイします。以下のコマンドを使ってhelloconfigの値を変更します。
$ kubectl patch hello.hello.example.com/example-hello -n hello-operator --type merge -p '{"spec": {"helloconfig": "hellob"}}'
hello.hello.example.com/example-hello patched
自動でPodが更新されるかと思いましたが、イメージ名の変更なので自動再デプロイはされませんでした。従って、手動でPodを削除して更新します。(Podを削除してもCRは削除されないので、自動で再デプロイされます。)
$ kubectl delete pod example-hello-pod -n hello-operator
pod "example-hello-pod" deleted
$ kubectl get pods -n hello-operator -o wide
NAME                              READY   STATUS    RESTARTS   AGE   IP          NODE          NOMINATED NODE   READINESS GATES
example-hello-pod                 1/1     Running   0          12s   10.1.2.20   microk8s-vm   <none>           <none>
hello-operator-64f7df787d-5tq8f   1/1     Running   0          14m   10.1.2.18   microk8s-vm   <none>           <none>
httpリクエストすると、example-hello-podがhellobアプリケーションであることがわかります。
$ curl 10.1.2.20:8080
Hello B
以上です。まずはOperator SDKの使い方がわかって良かったです。
コメント
コメントは停止中です。