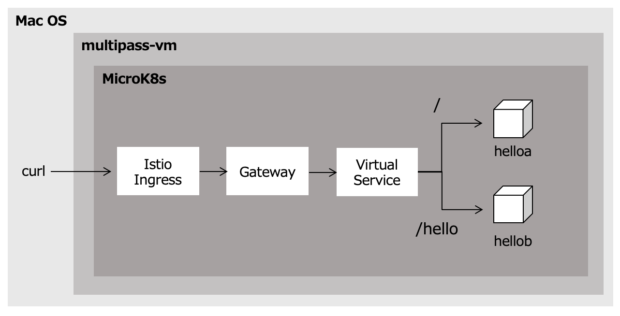
Istioを使ってURLパス単位で、コンテナアプリケーションを割り振ってみます。
- コンテナアプリケーションを作成する
- ソースコードを作成する
- helloaコンテナイメージを作成する
- hellobコンテナイメージを作成する
- コンテナアプリケーションを実行する
- Istioの設定をする
- Gatewayを作成する
- VirtualServiceを作成する
- 設定を確認する
コンテナアプリケーションを作成する
Istioの割り振り先コンテナアプリケーションを作成します。
今回作成するのは、httpリクエストをポート8080で受け付けると以下の振る舞いを行うアプリケーションです。
-
- / ・・・”Hello A” or “Hello B”を表示する
- /hello ・・・”Hello A” or “Hello B”を表示する
ソースコードを作成する
コンテナアプリケーションで使うソースコードをgolangで作成します。
main.goを以下に示します。マックスハンドラを使って、URL毎に使うhtmlファイルを分けています。
package main

import (
    "log"
    "net/http"
    "html/template"
    "fmt"
)

func main() {
    //index関数をルートディレクトリに指定
    http.HandleFunc("/", index)
    //hello関数をルートディレクトリに指定
    http.HandleFunc("/hello", hello)
    //サーバー起動
    if err := http.ListenAndServe(":8080", nil); err != nil {
        log.Fatal("ListenAndServe:", nil)
    }
}

func index(writer http.ResponseWriter, r *http.Request) {
  generateHTML(writer, "index")
}

func hello(writer http.ResponseWriter, r *http.Request) {
  generateHTML(writer, "hello")
}

func generateHTML(writer http.ResponseWriter, filenames ...string) {
    var files []string
    for _, file := range filenames {
        files = append(files, fmt.Sprintf("templates/%s.html", file))
    }

    templates := template.Must(template.ParseFiles(files...))
  templates.Execute(writer, nil)
}
main.goを実行するコンテナをビルドするためのDockerfileを以下に示します。
FROM golang:latest

# コンテナ作業ディレクトリの変更
WORKDIR /go/src/web
# ホストOSの ./src の中身を作業ディレクトリにコピー
COPY ./src .
RUN go build -o web
# ウェブアプリケーション実行コマンドの実行
CMD ["./web"]
ディレクトリ構造は以下の通りです。index.htmlとhello.htmlはhelloa, hellobアプリケーション毎に作成します。
$ tree .
.
├── Dockerfile
└── src
    ├── main.go
    └── templates
        ├── hello.html
        └── index.html
helloaコンテナイメージを作成する
httpリクエストを受け付けると”Hello A”を表示するhelloaコンテナイメージを作成します。
以下のコマンドを使って、”Hello A”を表示するindex.htmlとhello.htmlを作成します。
$ echo "Hello A" > index.html
$ echo "Hello A" > hello.html
以下のコマンドでコンテナイメージをビルドして、docker registryに登録します。このdocker registryはMicroK8s上にコンテナとして動いています。docker registryの起動方法は、MicroK8sでアプリケーションを動かすを参考にしてください。
$ docker build -t helloa:latest .
$ docker tag helloa 192.168.64.2:32147/helloa
$ docker push 192.168.64.2:32147/helloa
hellobコンテナイメージを作成する
httpリクエストを受け付けると”Hello B”を表示するhelloaコンテナイメージを作成します。
以下のコマンドを使って、”Hello B”を表示するindex.htmlとhello.htmlを作成します。
$ echo "Hello B" > templates/index.html
$ echo "Hello B" > templates/hello.html
以下のコマンドでコンテナイメージをビルドして、docker registryに登録します。
$ docker build -t hellob:latest .
$ docker tag hellob 192.168.64.2:32147/hellob
$ docker push 192.168.64.2:32147/hellob
コンテナアプリケーションを実行する
作成したコンテナイメージからコンテナアプリケーションを実行します。
以下のコマンドを使って、Injection済みのnamespaceにhelloaとhellobを実行し、サービスを公開します。Injectionの方法は、Microk8sでIstioによるABテストを試してみる(1/2)を参照してください。
ubuntu@microk8s-vm:~$ microk8s.kubectl run helloa --image=localhost:32147/helloa:latest --port=8080 -n istio-app
pod/helloa created
ubuntu@microk8s-vm:~$ microk8s.kubectl run hellob --image=localhost:32147/hellob:latest --port=8080 -n istio-app
pod/hellob created
ubuntu@microk8s-vm:~$ microk8s.kubectl expose pod helloa --port=8080 -n istio-app
service/helloa exposed
ubuntu@microk8s-vm:~$ microk8s.kubectl expose pod hellob --port=8080 -n istio-app
service/hellob exposed
Istioの設定をする
Gatewayを作成する
全てのホスト名をポート80で受け付けるIstioのGatewayを作成します。
yamlファイルを以下に示します。
apiVersion: networking.istio.io/v1alpha3
kind: Gateway
metadata:
  name: hello-gateway
spec:
  selector:
    istio: ingressgateway # use Istio default gateway implementation
  servers:
  - port:
      number: 80
      name: http
      protocol: HTTP
    hosts:
    - "*"
以下のコマンドでgatewayリソースを作成します。
ubuntu@microk8s-vm:~$ microk8s.kubectl apply -f gateway.yaml -n istio-app
VirtualServiceを作成する
/helloのリクエストはhellobに、それ以外はhelloaに割り振るVirtualServiceを作成します。
VirtualService全体のyamlファイルを以下に示します。match.uri.prefixを使うことでURL毎に割り振り先を変更できます。
apiVersion: networking.istio.io/v1alpha3
kind: VirtualService
metadata:
  name: hello-switch-url-route
spec:
  hosts:
  - "*"
  gateways:
  - hello-gateway
  http:
  - match:
    - uri:
        prefix: /hello
    route:
    - destination:
        host: hellob
        port:
          number: 8080
  - route:
    - destination:
        host: helloa
        port:
          number: 8080
設定を確認する
以下のcurlコマンドを利用して確認すると、正しくルーティングされていることがわかります。192.168.64.2:31380はIstio Ingressgatewayの公開Serviceで、[multipass-vmのIP]:[NodePort]です。IngressgatewayをNodePortにする方法は、MicroK8sでIstioによるABテストを試してみる(2/2)を参照してください。
$ curl -s http://192.168.64.2:31380/
Hello A
$ curl -s http://192.168.64.2:31380/hello
Hello B
以上です。ページなどモジュール単位で分けるようなシステムには使えそうですね!